Saturday, 28 September 2013

For your BESTIE!!!

It often is confusing about what to gift to your best friend. I mean gifting something to someone else is far easy. I was confused between two things- a photo frame or a card. Then I decided why not a cocktail  of both. 

        All we need is a card board for the base, colour papers, things (anything good) for decorating and a photograph. I used an old cardboard from one of my notebooks, painted few papers as I wanted some really different shades, got some beads and my favorite photograph.


I took the cardboard, stuck these papers on it creating a pattern.


                           Finally on the right hand side made a photo frame. 
                  It looked like this in the end.


Go ahead, get creative and create your own cool frame in a jiffy for your bestie!!!!!!!

Thursday, 20 June 2013

Message poster

There might be some nice quotes or messages which you wish to hang up on your wall. But then just quotes do not look that good and different. Then why not paint a painting related to your quote and then write your quote on it. You can then later add additional stuffs too to make it look attractive.
Here is something I have tried out.

First took an A3 sheet and painted on it.


 Later on I wrote my quote with a yellow paint. Pasted a picture on the bottom from a newspaper. A combination of newspaper collage and painting can create wonders.  For decoration I used ice cream stick to highlight the quote. Then using woolen thread created a pattern in the middle as if emerging from the heart.
Finally my painting looked like this.


It looked cool when hung on the wall in my room.
You can too try out something like this.


A Pen Stand

A friend of mine gifted me a really nice coffee mug. But I was more interested in the box in which the coffee mug was presented. Didn't feel like throwing it away. Moreover I was in need of a pen stand. So made one using this box as the dimensions felt appropriate to me. 

Materials  used:-
empty box
acrylic paint
( The reason I am so fond of acrylic is how well it sets on any object you wish to color)
newspaper
beads
golden wire
( Now these beads and golden wire was lying in my home as i have a sister very much interested in jewelry making. You can use other such things to decorate)


I took the box, cut out top portion and painted it light brown. Took a paper , drew butterflies and painted it blue. Then stuck this on all the sides of the box. 


It would be so good if there were nice inspiring quotes or messages on the pen stand to which you will be always looking at. I took a news paper and cut out such words and quotes and stuck it on the box. 


I decided on using golden wire and white bead for the butterfly's antenna.
Done with a pen stand within just 15 mins. I have used it to put my paint brushes and marker pens.


You can avoid using plastic stands. Replacing them with these cardboard boxes is the need of the hour rite? 
All you need is just a little time and a creative idea.

Friday, 29 March 2013


Love is like a tree that grows stronger year by year, 

cherished  by our laughter and sometimes by our tears.

Laughter because the fragrance we share in love serves 

the air for our love tree to grow and maybe these 

tears we cry out bestows water to keep it alive. 

These thoughts lingered in my mind while looking at this 

empty bottle:


That is when I ended up making a love tree in a simple vase. 

We can create an atmosphere of love and romance with a 

candle-lit evening dinner. With the help of a few materials 

around the house you can increase the romantic tone of the 

evening. Surprise your loved one with some simple 

decorations to turn an ordinary dinner table into a special 

one.

To get started:
I painted the bottle with acrylic paint.


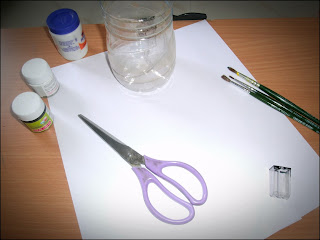
These are other things I used.


Then I took red colored sheet, drew many hearts and cut it out.


From the same sheet I cut out many stripes and curled them down as shown:


I then tied them with woolen thread.

Finally using golden wire, small white beads, attaching them all together to take a form of branches, here is the final love tree.


Many other bottles of different shapes and sizes can be used with varied decorations to beautify your home or decorate a beautiful candle light dinner table.


Wednesday, 27 March 2013

DECORATIVE BOX

Was just hanging out when mom was about to throw this empty box.


I thought why not create best out of waste. This box can be used for keeping so many things like toffees, jewellery, etc
All I needed was few scrap papers, an old marriage invitation card, a lace, golden wire, scissor and glue


I started decorating the box.


Finally this is what i got.


Think before throwing anything away. Making something useful just needs a little thought!!!!
Quick cards is what we all need. Most of the time we end up with situations where you need to give someone a card in no time. But then going out and buying it  makes it no special.  Also not all of us have stuffs needed for making cards. Then why not make 1 using just A4 sheet, black and white color.

WHAT YOU NEED?

     1]2 A4 SHEETS     2]BLACK AND WHITE PAINT
     3]BRUSHES
     4]SCISSOR AND GLUE


WHAT TO DO?
1] Take one A4 sheet and fold it into equal halves.


2] We now need to create a pattern on one side of this paper which will be the front side. you can take anything to create it. here i have taken a toothbrush cover.


you can create a pattern on the card as shown.


finally you will get it like this.


3]Keep this aside. Take another A4 sheet. Cut it into a rectangle with length 13cm and breadth 10cm. Paint it with black color. 


4] Now lets create a border to this using white paint. Draw dotted lines on all the sides as shown. 
 

hope you got this:


5] Now we need to add something in the middle of this.First select a figure. There are lot of options, like this one:
 

select one, start drawing on white sheet and cut it out.


6] Stick this on the paper from step 4


7]Now stick this whole thing on your card from step 2.


8]Take another strip of paper with length 10cm and breadth 2.5cm and paint it black.


Stick it to the top of your card as shown.


YOUR CARD IS READY!


You can create more such cards using just the black and white combinations. Just open up your mind , observe around and be creative. 
Here's one more of such kind:


Anyone can do it. All you need is to open up your creative mind . Hope you like it!!!

Tuesday, 26 March 2013

CREATIVITY!! I'M GONNA DESIGN IT.......

Have you ever felt like giving a handmade card to your loved ones. But not able to make one yourself. Lets begin with a simple card. Can be given on any occasions. Just a few steps.
Here we go. 
                         

               What you need:-
               1] two A4 size sheets
               2] paints and brushes
               3] glue and scissor
               4] scale and pencil


What to do?

1] take one A4 sheet and fold it into equal halves


2] Keep this aside. Take another sheet and fold it the same way. But cut this one into two equal halves.


3] Take one half and paint it into blue color.


here is what you will get.


4] stick this on the folded A4 sheet which we did in the 1st step.


It will look like this.


5] Now take another half . Cut 1cm on both the longer sides of the sheet as shown and paint it green.


6] Now draw circles at random places and cut them out.


7] Now finally stick this on the folded A4 sheet above which you have stuck blue painted paper.

8] You can decorate it by adding designs at the sides using black paper cuttings.

Here is how your greeting card will look:

 Note: 
 You can use any color combinations you like.

Hope you liked this card. Write out messages inside and your card is ready to be given.